Pages

Monday 30 December 2013

nDo and dDo

Two pieces of software in particular, nDo and dDo by Quixel have been creating a buzz in the industry. With nDo you can create a normal map from a texture based on a huge array of pre-sets, but you can also draw in Photoshop and it will update the normal map, therefore speeding up the traditional workflow of generating normal maps, by creating high-res sculpts and baking the detail to a low-res mesh. So I wanted to get to grips with the software as an alternative to sculpting.


For my character texture I used the chipped metal pre-set to generate the normal map. Once generated it opens up a view-cube in Photoshop and lets you see the material with real time lighting and how that will affect your model. You can also go in and paint on the document and control the pre-sets to customise the normal map how you see fit.

 
Once you've created your normal map, with dDo open you can put the diffuse and normal map in their respective slots and then pick a pre-set based on the effect you want to create. For my own texture I used Edge Scratch with White Worn Weapon to create random scratches around the edges of my UV's, it also adds effects such as oxidisation and random dirt to the material.


As with nDo, once dDo has baked the textures it opens a view-cube in Photoshop giving you a preview of how light will affect the material in 3D, you can also load your own mesh into the preview window. As well a diffuse and normal map with the added scratches and dirt, it also bakes out a specular and height map with these additions. The document is still fully customisable and updates in real-time to show any changes. It really helped to make my first colour pass texture feel less flat and naturally aged.


After exporting all the maps generated by dDo I then applied them to my model in Max for such a low resolution model I was really happy with the results. Rather than looking clean and new my character was looking aged and worn just like how I wanted.


The Final diffuse texture still needs work but I'm still learning both nDo and dDo. It's certainly helped randomise the dirt and discolouration applied to the underlying texture but perhaps overdone it! I also need to add more scratches around the edges of where the metal is worn to create a more natural look.


Sunday 29 December 2013

Digital Skills: Game Character Unwrapping and Texturing

At this point I have a huge amount of work to do with three ongoing projects that I've set myself. Uwrapping, and texturing my character, environment, and buildings, but also creating the cinematic for the opening of my game.This module was designed to give us the chance to experiment with new digital techniques. One of the major areas that I felt I needed to learn was UVW mapping and unwrapping, with all the assets I had for my brief I certainly wouldn't be short of models to practice on.

Previously I'd just used multi-sub object materials with simple box/cylinder mapping to texture my models relying on materials rather than textures. I knew this wasn't the way game assets were textured and it was a big gap in my 3D skillset. I shouldn't have been worried about the process, once I learnt the tools in Max they made the process much easier.

To begin with I had to optimise and remodel my character base mesh, some of the armour pieces were separate elements from the main body of the mesh where they would be better extruded from the base mesh itself. This would keep the topology clean for animation, reduce the poly count of the model, and help simplify the UVWs, but keep the overall silhouette of the character.

Once I was happy with the optimising I applied a 'UVW unwrap' modifier, to the mesh in Max. With all the UV's selected I used the flatten tool in the UV editor with a polygon angle of 80 degrees to flatten the mesh onto the UV texture space. As you can see it does a good job flattening the mesh but it's certainly not readable for use by a texture artist.


From there it's a question of selecting each part of the mesh and then stitching them together, it's up to the modeller how the UV's are laid out but it's important to make the final UV map readable, for example the chest-plate is stitched back together to create all one element as it would be in the real world. This is also where texture space comes into play elements can be scaled so they are all the same size using the normalise button but then areas such as the face can be scaled up a little to allow for more detail, although for now my character is wearing a helmet so the I haven't given him a face. It's something I plan on doing especially if the game narrative requires him to take off the helmet at any stage. Once each element is stitched back together they are then relaxed to avoid stretching the texture.


From the UVW editor window you can render and export the UVW map, to an image file. This image file can then be opened and textured in Photoshop, and then reapplied as a material in Max. This means you can work on texturing the file in Photoshop and it's updated in real-time on the 3D mesh. I already knew what I wanted my character to look like from the work I had done on my character sheet, so I created what is known as the first colour pass, it helps to quickly see how your character will read with lighting applied in 3D.

I added additional details such as bolts using the bevel tool in Photoshop and added other details such as edge scratches on the metalwork, and seams and clasps on the leather elements.


Saturday 21 December 2013

Weekly Targets

  • Finish modelling and optimising my Knight character
  • Unwrap the mesh
  • Create a first colour pass for my Knight texture
  • Take some time off and enjoy Christmas :)

Friday 20 December 2013

Cathedral Interior Level Concept

Whilst working on my exterior environment I quickly created a piece of concept art to show my design ideas for the cathedral interior. I already had a few assets that I had made as part of the shadow test I had done for my cinematic so I used them to expand upon my ideas.

Obviously the the scene would need texturing and lighting but it certainly portays the style and feel of how I want the set to look.

Tuesday 17 December 2013

Blocking out my level

With the assets and terrain I created I started importing the buildings into UDK to rough out the early stages of my level design. The ability to bring the elements together so quickly, focus on building placement and then jump into your level and walk around, was a dream in UDK. Preview mode gives a whole new perspective on how your assets will look in-game and gives immediate feedback on whether the placement of your assets will work.


There's still a lot of work to do including, optimising, UV mapping, and texturing but as an initial start to my level design I'm pretty pleased with the results. I imported all the elements into a new scene in 3DS max to get a better render of the environment and experiment with a plane with a water material to create an ocean around my islands.


Monday 16 December 2013

Weekly Targets

  • Import all my building models into UDK and place them on the terrain based on the sketches I've created.
  • Start blocking out the interior of the cathedral for my animatic

Friday 13 December 2013

Illuminated Knight Building Assets

In conjunction with making the terrain of my level and based on my concept imagery  I started sketching and blocking up simple building assets. At this point I wanted to keep things as simple as possible as it was just the layout stage for my level, but also keeping polygon budget and UV unwrapping in mind (I knew there was going to be a lot of unwrapping!).


The first few buildings were designed with the starting fishing port/village area in mind. They are very simple but should be easy to unwrap and texture with a low poly count. Once textured I'll distort and warp the geometry to give a more aged look to the assets as you can see in the sketches. Doing it this way means the texture will warp with the geometry as it deforms.


As the player winds through the streets the buildings become more sturdy and opulent to show the wealth and status of the citizens in the world. This medium townhouse asset acts as a halfway gap between the poorer, port buildings and the large townhouses that ring the market plaza.


The large town house will be packed closely to create the narrow shady streets that branch off the main square. I followed my reference material closely so the upper floors over-shadow the street below. Levels can be broken down in a modular fashion to create new buildings of various heights.

A medieval environment/game wouldn't be complete without a traditional tavern. It could act as a quest hub or a place to team up with fellow adventurers. I spent so much time inking up my initial building sketches however that I didn't have time to build this asset. I have made a few smaller props such as a well and outhouse but for now the assets I've created should be sufficient to block out the level.


Thursday 12 December 2013

Snowdrop Next-Gen Engine


At Games Horizon earlier this year head of Massive Entertainment, David Polfeldt was tight lipped about their upcoming games, however he did say that 2014 was going to be a year to be excited about in the games industry. After seeing this video demonstrating the engine for their upcoming game, 'The Division' we can now share some of their excitement.

Tuesday 10 December 2013

Weekly Targets

  • Draw simple building assets based on my environment research
  • Ink up my sketches using Mischief
  • Start blocking out the buildings in Max

Monday 9 December 2013

Creating Landscapes in UDK

This would be one of the first levels I've ever worked on using all my own assets in UDK. I needed to create the terrain of my level based on the top down concept map I'd made, so I decided to create it in UDK. To help me do this I followed a tutorial by Digital Tutors on creating maps for MMOs but adapted it to suit my purpose.

One technical issue that must be adhered to, whilst starting a landscape in UDK, are the map sizes that UDK uses. This handy table helps insure the map you create conforms to those constraints.


Whilst in UDK with the landscape edit tool enabled and the desired map size created as a plane in the viewport, you can use a tablet to paint the landscape. Building up forms with the additive brush and the clay tool enabled, it's very quick to sketch out mountains and plains. You can flatten, and smooth areas where required with the respective brushes, and to finish chisel ravines and erosion into the landscape with the erosion tools.


Thursday 5 December 2013

Illuminated Knight Turnaround Sheet

A lot of work went into the creation of my character turnarond sheet. It was also a great exercise to practice my Photoshop skills. I used the same technique we were taught last year with my Kung-Fu Druid character, starting with the highlights and shadows and then overlaying textures over them to give a 3D look to the illustration.


I paid particular attention to the layout of the finished piece, setting up guides in Photoshop to act as 'safe frames' on the canvas and make sure all the elements of the image have the correct placement for print or screen.


I'm pleased with the final piece, it was good to practice my illustration and 2D skills, but I doubt as much work would go into a character sheet that was being used internally in a studio where the image would be used to help the 3D artist. To improve the image further I'd need to work on the shading a little more, and 'weather' the character's armour to give it a more 'lived in' look. It will certainly help when it comes to the texture and colour choice of my character when texturing it in 3D.

Tuesday 3 December 2013

Illuminated Knight Environment Concept

Creating game environments is a very similar process to that of character design, in fact during development there will be a lot of back and forth as each inform the other during the course of a games development. Of course all of a game's assets are derived from the initial game concept to create a strong sense of unity between the characters and the environments they inhabit. As with characters, the shapes within the environment have a huge influence on how the designer wants to make the player feel. The relationship between the character and environment may change over the course of a game to create different emotions and enhance the narrative.

 As I did with my character design, my environment design started with a lot of research and reference material. Then I created a mood board using the images that best captured the themes and details I wanted to convey.


Based on my initial storyboard I knew the first level was going to be the games' main hub. The player would be washed up or dropped off at a medieval fishing port, the path would wind around the city to a market plaza where the player would get quests and equipment but also to be introduced to the games mechanics. In keeping with the 'Stained Glass' environment I wanted the mechanics and game designs to be based around the properties of glass, such as using sand and fire to make/destroy glass, and use glass to reflect light or change colours as puzzle elements in the level.

However the main focus of the environment would be an enormous cathedral that would dominate the landscape. Initially offlimits to the player, once the player has learnt the basics in town, a final puzzle challenge would open the doors. From then on the majority of the game would take place inside the cathedral's many levels.

 To help realise my ideas i quickly sketched a top down map of my environment. Multiple pathways add interest and exploration to the level but is also in keeping with the tightly packed medieval street design I wanted to convey. In conjunction with this I created an asset list of the props and buildings I would need to dress the level, it's pretty daunting!


Sunday 1 December 2013

Weekly Targets

  • Start creating a mood board for my environment concept
  • Draw a plan view of my basic level design
  • Find out how to create terrain in UDK
  • Shade and colour my character profiles
  • Create a turnaround sheet that fits with the themes of my character design

Wednesday 27 November 2013

Idiots


I love this video by Big Lazy Robot Studios that questions the nature of consumer culture. Apart from the cardboard surrounds, and the smoke that comes from the big robot, the rest of the animation is done in 3D. Their previous work Keloid shows the skill and passion the studio put into all their work, with staff credits that include working on projects for Weta and District 9, I'll certainly be keeping an eye on these guys.


IDIOTS from BLR_VFX on Vimeo.

Tuesday 19 November 2013

Black and White Knight, Alternate Game Idea

Whilst working on my 'Stained Glass' game concepts I came up with an interesting alternative to my idea. Experimenting with my base mesh and the ink and paint render I came up with the idea of a kind of 'Two-Face' knight, one where the player can choose their own light or dark path. The game would be a 2.5D side scrolling platformer when the player changes their direction of movement the whole world changes in a Zeldaesque light/dark world mechanic, little bunnies would become raging worgens and friendly villagers, horrific demons. The art style would be akin to that of Limbo but with a Celtic design to the environment and assets.


Saturday 16 November 2013

Illuminated Knight Base Mesh

Once I had inked up my character profiles I steamrolled ahead with translating the designs to 3D. I wanted to keep the character as low poly as possible and concentrate on topology to make it easier for UV layout and animation.


At under 3500 polgons I'm really happy with the results, it still needs some optimisation, but after that I can concentrate on UV mapping.

Friday 15 November 2013

Weekly Targets

  • Finish inking up my character poses
  • Create the base mesh of my character in Max

Loop De Loop - And the creation of Rocktopus

As a break from our main brief and as part of our work based learning, I was asked if I wanted to join with the animation students in designing and animating a character for an online bi-monthly animation contest called Loop De Loop. I thought it would make for a nice respite from the level I'm creating in UDK as it has been taking up my every waking thought. I sometimes find it's better to have a break from such a project and then come back to it with fresh eyes. It was also an opportunity to learn more about After Effects, animation, and character design restricted around the choice of supplied music.
I chose the track 'Bionic Commando', a mix of electro, rock, and retro 16-bit computer game music. With only a week to do the project I wanted to keep the character very simple so I could concentrate on the animation, which had to loop.
I created a variety of characters based around a 'Rock' theme, but the music had a slightly 1950's alien section to the score, that inspired me to create the character that I've dubbed 'Rocktopus'. I imagined a cartoony version of Cthulhu rocking out, but that evolved into an octopus that has taken control of the body of a dead rocker, whilst throwing a little bit of myself into the shape and personality of the character.


I began to ink up the character in Adobe Illustrator, taking care to separate each element that would be animated, when importing the file into After Effects.


After completing the illustration I then imported it into Photoshop to separate each element onto their respective layers and to prepare the file for import, as After Effects will keep the Photoshop layers intact.


In After Effects I installed a plugin called DUIK, that enables you to set up IK rigging in a similar way to IK rigging in 3D. I used it to create bones and controllers for my character to make the animation easier. Moving the controllers moves all the bones along a chain rather than moving each limb individually. The other challenge whist animating was to make your character move in time to the beat of the selected track. Luckily the Loop De Loop site provided a link to the site All8 which allows you to tap along to a beat and work out your frames per beat at a selected frame rate, 24 fps for this project.

I made a rod for my own back when it came to the character I chose as it's essentially two characters to animate, so each limb had to have it's own IK chain and controller which became a bit overwhelming when working with the layers in AE.


In relation to the brief my final animation fit all the entry requirements, it looped, it danced in time to the beat, and the character was unique. Given more time I would've liked to have put in some strong highlights and shadows but this would have required more elements to animate and given the time constraints that wasn't possible.

Surprisingly my submission was chosen as a finalist for the competition, and after seeing the quality of the other entries I was really happy, even if I didn't win, especially as I'm doing Games Design rather than animation, and I was the only one in the college that got chosen. It has spurred me on to get more of my work out there, and enter as many competitions as I can.


Thursday 14 November 2013

Mischief Maker

I've used Adobe Illustrator to 'inkup' quite a few of my drawings on previous projects, but the line work tends to remove a lot of the dynamism of an image, that you get with a pencil sketch. I'd heard good things about a program called Mischief so decided to use it to digitise my sketches. Mischief is the closest I've come to using pencil and paper on a computer compared to other digital art packages, retaining some of the sketchiness I wanted to keep. It also has great features such as an infinite canvas that means you can keep zooming into the canvas and add unlimited levels of detail, resolution only comes into play when exporting your image.


Wednesday 13 November 2013

Weekly Targets

  • Ink up the sketches I've already created
  • Create a simple character design for the Loop-de-Loop animation
  • Animate the character in After Effects

Monday 11 November 2013

Character Poses and Initial Animatic Development

I wanted to create an animatic from the storyboard I already had, it's a great way to quickly mock up a 'functional animation' that would help when I translate the scene into 3D. To get the poses I wanted, for each scene, I photographed a fellow student in various stances. It just so happened that the hall at college made for a perfect substitute for the church aisle in my scene.

Once I had the reference imagery it was easy to draw my character design around the poses, to portray the character emotion in each scene.


In conjunction with the poses I started working on some of the background elements for my animation. I used Sketchbook Designer to create vector assets of knight silhouettes that will be animated in the background as my knight character opens the cathedral doors. I also experimented with animating and projecting these assets as shadows, on a simple 3D scene, as proof of concept.


Monday 4 November 2013

Character Expression Sheet

To help develop our characters further, we were given an assignment to create different expressions for our characters. Even though my character choice made the process a little trickier as he's wearing armour, it was good to work within those limitations. Instead of using the face to express the characters' emotion to the player, I should have drawn full body poses of the emotions I want to convey.

Friday 1 November 2013

Weekly Targets

  • Start working on my character turnaround sheet based on my moodboard
  • Continue filling in the expression sheet
  • Take photographs that I can use as reference when sketching out the poses for my animatic

Wednesday 30 October 2013

Illuminated Knight Character Design Concepts

As with every design I tend to go overboard with my research, once I've collected reference imagery it helps to take the best images and create a mood board of interesting styles that fit with your initial design concepts. From the storyboard and character bio I had created I already had strong ideas of the kind of character I wanted to create, a Teutonic Knight. I collected lots of different armour sets for my mood board but needed to keep the design consistant and historically accurate. The design I decided to choose copied a style in keeping with the period, but with the big horns on a Teutonic Knights helmet, gave my character design a strong silhouette.

Monday 28 October 2013

Illuminated Knight Character Biography

As part of the character design stage and to help realise our characters we were given a worksheet to fill-in with our character biography. Doing this helps to fully visualise your character from it's traits, to where it lives, and what it looks like, but also how it may animate or react to a situation or environment.

Character Bio:

Age: 28-32
Profession: Teutonic Knight/Mercenary/Crusader
Family/Friends: None, Raised by a Blacksmith, sold to a wealthy knight to train as his squire.
Goals/Ambitions: Money/Glory/Recognition
Physical Health: Broken, World Weary
Education: Trained/Raised as a Squire, Swordsman, Smith
Sex Life: Vow of Chastity
Values: Just, Honourable
Weakness: Age, Too Honourable, at the end of his professional life
Flaws: Too old for his job
Environment: Ecclesiastical
Culture: Religious
Gender: Male
Income: As much as he can carry
Religion: Christianity (Faith is wavering)
Hygiene: Basic – Cleanliness is next to godliness
Morals: Chaste, Pure
Intelligence: Average – High, Cunning
Sense of humour: Dry
Obstacles: Birth rite
Talent: Skilled, Swordsman, Cunning
Self View: Harsh, Angry
Ethnicity: White, European
Era: Medieval
Dreams: An End to violence, deal with personal demons, a quiet life, to return home and live in peace
Diet: Poor, Meager
Fears: Persecution in the afterlife
Childhood: Sold and raised by a blacksmith, taken on as a squire by the local lord who noticed his talents

Character Back story

Born to a low wealth family he was sold to a blacksmith for a better life. Forged by steel and fire, instilled with strong morals and a work ethic, his talents at smithing gained the attention of the local lord and was taken on as his squire. He was trained in pageantry, educated in Latin and groomed to become a knight by the kindly lord. The lord however died of the plague and our hero was stripped of his bequeathed land and title by the lords extended family. Forced to wander for years the knight did his best to uphold his morals and fight injustice wherever he saw it. The land was cruel however and our hero was forced to walk a thin line between good and evil. When Richard the Third declared his crusade our hero signed up to escape the despair sweeping through the land, prove his skills, and fight for the chance of honour, glory, and riches.


Obviously I had to create a character that would fit with my storyboard, and my 'Illuminated Knight'/Stained glass window game design idea, but after completing this exercise I feel reading all of Game of Thrones last summer has had a little influence on my character....Gendry perhaps!

Friday 25 October 2013

Illuminated Knight Storyboard

From my initial game design research I worked up a storyboard for an opening cinematic that would be a great introduction to the narrative for the player, and visualise the design concepts I wanted to convey.

Storyboard

Scene 1:

Interior of a church, dark, dimly lit with a few candles on sconce’s and chandeliers. The sound of a battle can be heard raging outside.

The camera pans down the isle focusing on the walls, shadows of men fighting dance across them, illuminated by the huge fire that engulfs a nearby settlement. Cries of pain, steel clashing against steel can be heard ringing from a thousand different sources.


Scene 2:

Bang, Bang, BANG! The camera quickly turns to face the door as each bang makes the door shudder. With the focus on the doors, they fling open. A knight with head bowed holds them both open at arms length silhouetted by the light of the burning city in the background. Silhouettes of men fighting and dying in battle fade into the distance as far as the eye can see behind the weary knight.


Scene 3:

Focus on the feet of the knight as he trudges, wearily down the isle, pools of blood congeal beneath every step he takes, each one seemingly heavier and more painful than the last for the battle fatigued warrior. The door creaks behind him and slams shut (off camera). Gregorian chant can be heard softly in the background mixing in with the sounds of battle.


Scene 4:

The camera pans lazily with the knight, he surveys the windows of the church as he walks revealing the rich stained glass that adorn the walls (each window should be representative of a different level, boss, or scenario within the game). The knight turns his head from side to side staring in wonder at the rich artwork.


Scene 5:

The knight flops down at the altar on his knees resting on his sword. Its point digs into the stone floor as he rests both hands on the pommel and his head on his hands, he begins to pray. As he prays the camera rotates around to behind him and as he looks up the camera pans up as well revealing a large stained glass window which depicts a galleon on an ocean. Sounds of gulls can be heard at that moment, are they outside? The galleon moved or is it a trick of the light?


Scene 6:

Focus on the feet/legs of the knight the sound of glass tinkling on the ground can be heard as a small blue, sapphire like gem, bounces into frame and rests by the foot of the knight. With each bounce the gem catches the light and sparkles (lens flare, and slow motion perhaps?).


Scene 7:

The knight picks up the glass shard gently between his armoured thumb and forefinger and holds it up to the light of the altar window, rolling it slowly as he does so (it catches the light again). Focus on the gem, then focus on the window in the background, at the same time he notices a small hole in the blue ocean of the stained glass.


Scene 8:

The knight steps up and moves closer to the window. Focus on the hole as he traces it with the tip of his mailed index finger. The Gregorian chant begins to be heard more clearly over the noise of battle.


Scene 9:

Focus on the feet of the knight as blue sapphires start to rain down around them from the top of the frame. (Slow motion, hopefully done using Realflow/Particle effects). Again each gem catches the light and sparkles.


Scene 10:

Camera behind the shoulder of the silhouetted knight, focus on the window as it starts to crack and then explodes into a million pieces and roars through the window like a burst dam. The knight is pushed forcefully back out of the scene to the right. The music also picks up to a crescendo.


Scene 11:

The gems fill the church, the knight struggles but then is engulfed, drowning in the sea of sapphires. The last thing we see is his hand closing into a fist as the gems rise higher covering the frame of the scene. The music dies.


Scene 12:

Black, the sound of gulls and breaking waves can be heard. The scene starts to resolve itself above a gently moving sea that appears to be made of stained glass. A large shadow looms into the scene and the sound of splashing oars can be heard. A hand plunges from the foreground into the water and when it pulls back is holding onto hand of the helpless knight.


Scene 13:

As if the stained glass window has come to life, the galleon from the previous scene is now gently rocking back and forth on the sapphire waves. Crew members rush back and forth doing their daily duties, as seagulls wheel and call in the air. One of the crew pulls the knight aboard, he slumps down on his knees coughing, as the crew member pats his back and the points to the left. The galleon slides gently left and into a bustling port, as far as the eye can see a city of spires stretches into the distance. Sounds of children playing, sellers shouting, and dogs barking bring the scene to life.


Scene 14:

The title screen pans in from the right 'Illuminated Knight', as clips form different levels of the game flash onto the screen, hopefully this will give the player the idea of what they can expect, but also act as a game trailer/demo. It'll highlight the in game mechanics, glass vs stone, ice, fire, sand, reflective puzzles (moving statues to reflect light for puzzle elements), or overlaying different colours of glass to create new colours

Monday 21 October 2013

Brothers: A Tale of Two Sons. Game Mechanics Vs Narrative


What makes a game has been the subject of much debate recently with the argument torn between mechanic vs narrative. In my opinion it's game mechanics that make a game, where the narrative ties the mechanic together, the mechanic is what keeps a player coming back and adds replayablity to the product. There are plenty of examples of games that became wildly successful with no narrative to speak of, e.g Tetris, Pac-man, and more recently Minecraft. There are also examples of games that purely focus on the narrative and while they give the player the ability to choose their own path they offer little in regards to replayability, once the story is complete there is little more to experience bar a few slightly different scenes and endings, e.g. Heavy Rain, Dragon's Lair, even Modern Warfare to some extent.


Recently there has been a fusion of the two that marry both in the way no other media could do, I believe it is the next evolution of the genre, a perfect example of this would be Brother's: A Tale of Two Sons, created by Starbreeze Studios. Initially released for XBox Live on August 2013 the game follows the story of two brothers on a quest to cure their terminally ill father. Unusually the player controls both brothers on the the same controller, it may feel a little overwhelming at first but the game eases the player into the mechanics through a series of easy environmental obstacles. These mechanics tie beautifully into the narrative throughout the game as each brother reacts differently to context sensitive obstacles within the world, the player discovers more about each brothers individual personality naturally with this method rather than being told outright.


This fusion of mechanic and narrative becomes starkly apparent during the final levels as the older brother (SPOILERS) dies, not only does the player feel the loss of the brother through the emotional narrative that the player has been on but through the loss of control of the character. It's quite difficult to describe the feeling to someone who hasn't played the game but I can only describe it as phantom limb syndrome, having controlled both characters throughout the game, only controlling one feels extremely odd, this loss mirrors and enhances the narrative in a way I haven't seen before and has really inspired me. I believe this is the future of the genre and it's what sets games apart from any other medium.

Friday 18 October 2013

Weekly Targets

  • Create a biography for my knight character
  • Write up the Storyboard idea for my opening cinematic
  • Research armour designs for my character
  • Create a mood board of armour sets

Friday 27 September 2013

Box. Amazing 3D animation


Here's a great video using projection mapping on moving surfaces by The Creators Project, linked with the movements of the camera it gives an amazing 3D illusion.


Tuesday 17 September 2013

Illuminated Knight Game Concept


Over the summer my brief was to come up with a variety of game ideas and choose one that could be worked on throughout my second year. I find I'm never short of ideas but the one i eventually chose had to be of sufficient scale to be worked on for the next few modules, bring together all the elements that I have learnt so far and expand/practise those skills, also, ambitious as it may sound, to try and do something unique and stand out within a saturated market place.

 Next year we are going to see the long awaited return of virtual reality, with the arrival of VR peripherals such as the Oculus Rift and Sony's proprietary headset. I'm really excited as I remember the VR boom that happened in the mid-nineties but unfortunately the tech at the time failed to live up to expectations.With the raw processing power, increase in graphical fidelity, and parallel advances in mobile phone technology such as the miniaturisation of displays and accelerometers, the time seems right for VR to make a come back. The buzz around the Oculus Rift is very positive and it would be foolish to ignore the potential new marketplace, and the chance to pioneer new gaming experiences using the tech.

Developers such as Epic and Valve are already adding mod support for the Rift to their game engines, and CCP have announced their own standalone, space combat game, Valkyrie, where players dogfight in spaceships based around the Eve online universe. With that in mind in relation to my own game design ideas, I felt a first person, VR, horror game using the Unreal engine would be an ideal project. Horror games are pretty intense at the best of times I imagine with the added immersion of VR future horror games are going to have to come with a health warning! I thought an archetypal haunted house scenario would make a great setting for an early project but to make it more unique I wanted the artwork to reflect the cinematography of horror maestro Dario Argento. Italian film director Argento is probably best known for his work with George A Romero on the 'Living Dead' series but has also produced some cult classic horror films such as Susperia (a personal favourite of mine).
Susperia follows the story of a women who joins a convent but soon learns that it's actually a coven of witches. Whilst this would make a great narrative for a haunted house game it's more the way Argento uses colour to create mood within his films that I believe would make for a game with a unique style.


I envisioned a game where the player navigates around an almost pitch black environment populated with islands of colour. These would signpost the player through the levels and act as areas of safety, and discovery within the game. However, as Argento does in his films, the colour in the game would also help set the mood for the player, and eventually the darkness would become the players friend. Even though I believe this would make for a great experience, I'll have to wait to buy a VR headset to experiment with my idea.

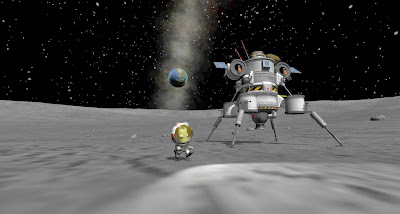
Another idea I had over the summer, was based on Kerbal Space Program, the game gives the player a set of modular assets that can be combined together to create their own rockets, satellites and space vehicles. Once built the player can take their vehicle to the launch pad and try to get it into orbit. The gameplay comes not only from the fun of building but the realistic physics the game uses whilst launching a spaceship. It simulates the effects of gravity so the player must balance payload, fuel, centre of mass, aerodynamics, and structural integrity to achieve orbit. Many Kerbal's will die a fiery death whilst the player gets used to these mechanics but that's half the fun.


During my playtime with the game I realised this could be turned on its head, rather than exploring space, a similar game could be created that explores the deep sea. The player would be the head of a research/exploration company where they are given limited resources and modular assets to build submersibles. Quests would have the player plumb the bottom of the seas for salvage, rescue, and discovery, that will reward the player with cash, science points, and better submersible assets to use on increasingly challenging missions. As well as building vehicles the gameplay will come from the risk/reward of the pressure vs depth challenge that would come with each dive. The player would want to go that little bit deeper for more rewards or the chance to see/capture a unique species but with the added risk of the submersible imploding. I also thought this idea could incorporate the Oculus Rift, having the player pilot a submersible from a first person perspective with a VR headset would add a whole new level of immersion. Graphical effects such as glass cracking, emergency lights blinking, and strange fluorescent creatures that loom out of the darkness, would all add to this eerie sense of claustrophobia that I would want the player to feel.


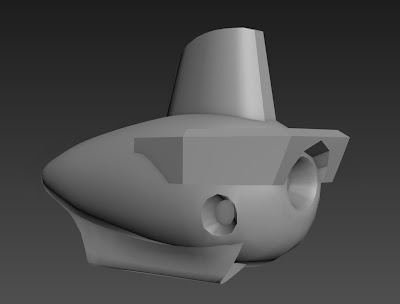
 I even started to model a very basic submersible that would act as a concept piece for the game idea. The submersible would be at the bottom of the sea surrounded by thermal vents with luminous, deep sea creatures hiding in the darkness around the vehicle, waiting to strike.

Even though this idea has a strong premise and unique gameplay it lacks narrative, and as I've discussed previously it's my opinion that a good game doesn't need narrative if it has unique mechanics, but I knew my upcoming modules would require a storyboard element, as I'm so closely tied to the animation department, so I've put this idea on the back burner for now. Seeing as the developers of Kerbal Space Program have embraced the modding community, I think this idea would make a great mod, rather than a standalone game.

I had another idea that sprang up from the haunted house theme that I'd researched. Dungeon Keeper created by Bullfrog in 1997 was one of my favourite games of all time. You played as an evil overlord and with the help of your imps you were tasked with building a functioning lair with amenities to attract more powerful creatures that would help you defeat the lord of the land, e.g building a graveyard would attract vampires to your cause.
 

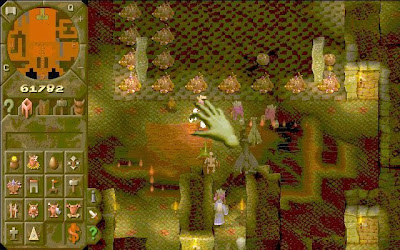
It had a great art style and sense of humour, and is still one of the few games where you get to play as the 'bad guy'. Unfortunately Bullfrog lost their magic when Peter Molyneux left to form his own company, and the series has never been revisited. I wanted to use the Dungeon Keeper format, an isometric, strategy management game, but with my own twist. My game would be set in a haunted house, at the heart of the house would be the Necronomicon (Ala Evil Dead), you would build traps and summon minions to guard the house and its contents, however tonight is Halloween and all the local kids have dared each other to enter your domain and try to steal your source of power.


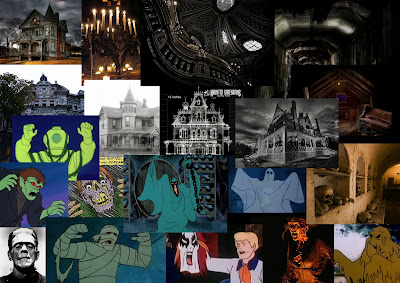
Structurally and tonally I'd like to think the idea lies somewhere between the film 'Cabin in the Woods' and Scooby Doo, in reference to that I'd already codenamed the game title as, 'You pesky kids! Unfortunately this idea had little in the way of narrative and the idea was pretty much set around the mechanics of the gameplay. I struggled to think of ways to develop the game using UDK, although the mechanics of the game would suggest a tile based asset set, so players could build and expand their haunted house, this would require a level of programing way above my skills.

Whilst researching the haunted house idea I collated a lot of reference imagery, some of this research consisted of looking at stained glass windows. One image in particular inspired the storyboard I created for the beginning of my 'Illuminated Knight' game.


This stained glass window would be the one that bursts above the altar, as my knight character is looking at it, and then the galleon that rescues him during the first scene inside the window. As proof of concept and part of the animatic I want to create, I need to animate this image, so I've started vectorising it using Sketchbook Designer 2014.


As well as coming up with a viable storyboard for the beginning intro of my game I realised I could make the artwork compliment the narrative using an ink and paint render technique. I'd experimented with the ink and paint render in max during my concept art module, from year one, whilst making my Kung-Fu Drood environment.


The ink and paint render has been popularised in many games such as Telltales' 'The Walking Dead', and 'A Wolf Among Us'. In both cases the games were based on graphic novels, so the ink and paint render was used to give that illustrated, hand drawn look to the 3D artwork.


In relation to my own game idea I'm hoping that the narrative of the game, and the use of the ink and paint render in UDK, will convince the player that the 'game world' is set inside a stained glass window. I also felt this idea ticked all of the boxes in terms of learning outcomes. I had a character and an environment to design based around my storyboard, all of which could be worked on in UDK. Hopefully this project would help me practice and learn, importing my assets into UDK, UVW unwrapping, texturing, and animation.

The other main source of inspiration for my game concept came from a visit to see the Lindisfarne Gospels over the summer, but also the rich history, myths and legends that come from our region. I'm also a keen photographer and love the landscape of Northumberland so I intend to base my game environment and the architecture around it.


Thursday 12 September 2013

Pacific Rim: Before and Afters

I loved Pacific Rim, the visual effects were outstanding! This video by Mirada Studios breaks down the production process of some scenes from the film. It shows not only how the visual effects were produced but also the shear volume of work, and talent that went into it.


Sunday 25 August 2013

Panzer III High Poly Model

As if it wasn't obvious I really enjoy high poly modelling. Whilst not suitable for game modelling, I love capturing every detail, nut and bolt, of an object or environment. I guess it stems from my childhood when I would spend hours building and painting my AirFix kits, and then displaying them in battle scenes I'd create in my bedroom. Using image planes readily available online I created this model of a WWII Panzer III tank in 3DS Max. Weighing in at 6.4 million polygons it took about three weeks of my spare time but I think the results are worth it.


Thursday 22 August 2013

Black Ink

I recently purchased a new digital paint program called, Black Ink. Rather than mimic traditional media as most painting software does, the developers of Black Ink have designed it around digital art creation. Features such as node based brush creation, infinite canvas, and GPU rendering set it aside from other packages.

I used a few different brushes with the content aware tool checked and painted over some of my own photographs, I'm pretty happy with the results.


Sunday 28 July 2013

The Stanley Parable

Originally a mod for Half Life 2, developers Galactic Cafe have just released a full, stand-alone, version of their seminal game, 'The Stanley Parable', on Steam. It could be argued that it's not a game in the truest sense of the word but more of a virtual installation, that questions the very nature of gaming and the way we experience the medium.

Without spoiling the experience it has quickly become one of my favourite games of all time. You play as Stanely, an office worker that has spent his working life pushing buttons, then one day the code he has to input stops. Stanely finds himself alone in the building and must find out where everyone has gone, and thus his adventure starts. The whole game is voiced over by a narrator, every object you interact with and every turn you take is commented upon with a Monty Python esque quality. The game never seems to end, with hundreds of variations on the way Stanely's adventure plays out. For example you can close the door to your own office at the very start and that's it, the narrator comments that Stanley waited there until he dies and the game restarts, that was just one of Stanley's stories. The game constantly breaks the forth wall with the narrator talking directly to the player and questioning their motives, eventually question the very nature of gameplay and even more philosophical matters.

I certainly recommend it, even if you just download the demo from Steam, in fact the developers have made the demo a completely different experience so you don't spoil the full game. The developers also released a video, based on a letter they received from a player, who was criticising the game. The player clearly doesn't understand what Galactic Cafe were trying to do with the game, but the video really showcases the sense of humour that the Dev's have, and which is prevalent in the game.