- Research Creativeskillset.org for job opportunities in relation to my current skillset and where I need to improve.
- Find a tutorial to help me practice my Zbrush tuition.
Monday, 17 March 2014
Weekly Targets
Friday, 7 March 2014
Creating Game Quality Vegetation Assets
One of the things I was
keen to add to my level was vegetation, I thought adding these
elements would really bring it to life, fill in bare areas of the
terrain, and add interest to the landscape. The problem with creating
these elements was in keeping the polygon count low while making them
look as realistic as possible. Trees are also some of the most
complex natural shapes and whilst there's plenty of ways to create
trees, including presets in Max and programs like SpeedTree in UDK,
It's a technical process that I wanted to learn, and update my
skillset.
With this being a very
technical discipline, to create the vegetation I had to follow a
tutorial that covered this process. I found a great tutorial by 3D
Motive called 'Creating Foliage for UDK' that I used to help teach
myself how to bring these elements into UDK but also animate them
though the use of materials in the engine.
The first element I
learnt to create was grass, again what should be something simple, if
we created individual blades of grass as models and then import them
into UDK, we would need thousands of instances to get any decent
coverage, and the polygon count would be astronomical.
To keep the poly count
low but still create realistic looking grass, we can still model the
grass in a 3D program such as Max and then 'bake' the models to a
texture plane. In this way we can capture all of the lighting,
specular, and diffuse information of a 3D asset but then it will
still read in a similar way on an image plane when in a game engine.

Once the texture was
complete I then took it back into Max and applied it to the plane
that was used as the render to texture object. I then split the plane
into the two smaller polygons at the top and the larger grass asset
at the bottom. With preserve UV's enabled I then moved the vertices
of each asset to tighten up the geometry around the grass texture, it
also means less geometry is rendered in UDK (every little helps).

Both the grass and trees were going to be animated in UDK through the use of materials. To do this I had to paint the vertices using 'vertex colour', a red gradient lighter at the top meant the grass should bend more at the top whilst staying fixed at the base.

I went through each asset in a similar fashion and then created random clumps that I can scatter about my terrain.

The trees were created using the same techniques as the grass, modelling the branches, baking textures and normals, painting the vertices, and then grouping the planes.
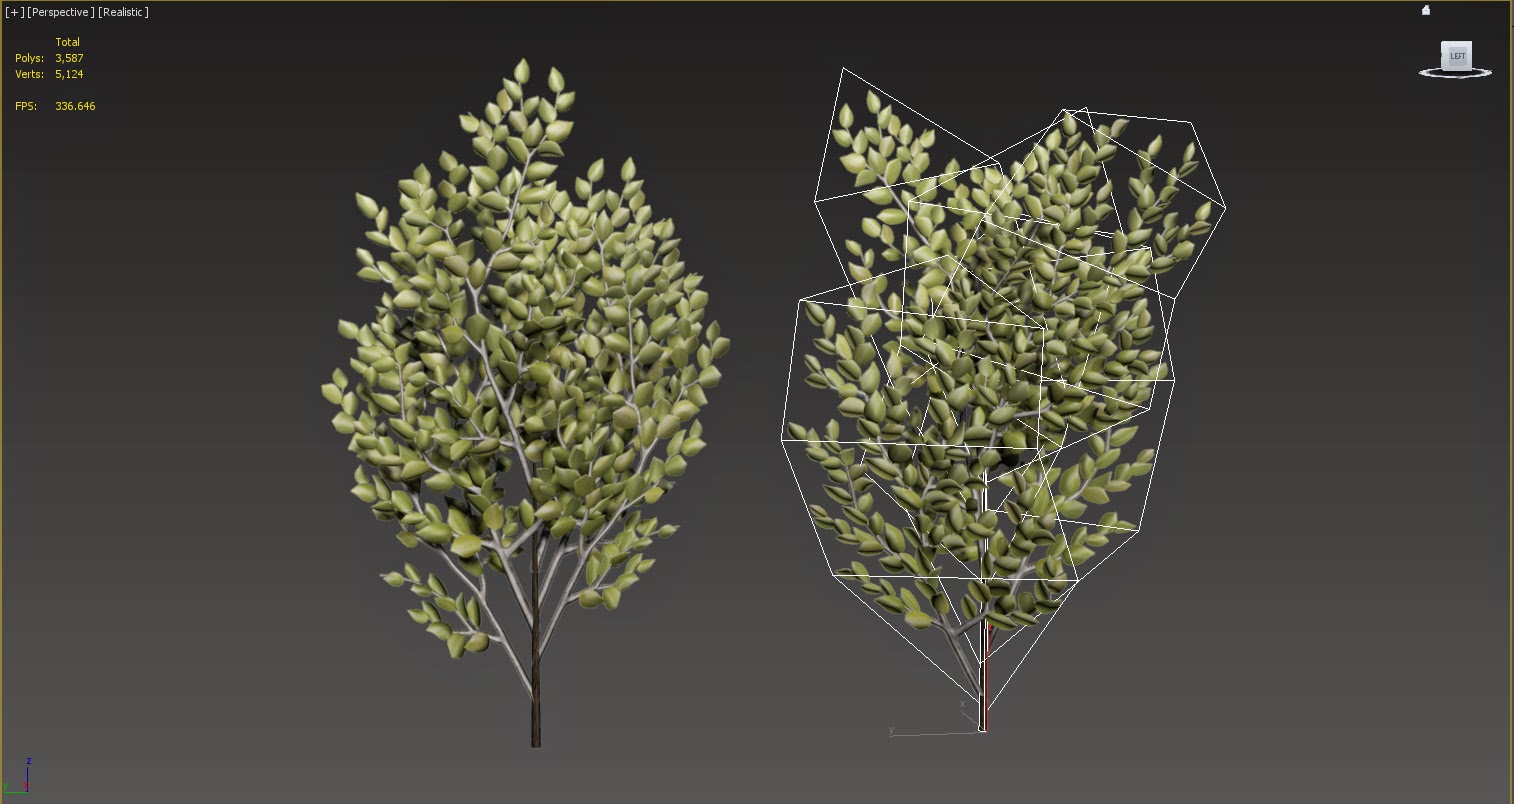
I used splines to create the trunk and branches, and then attached the planes to them trying to create a naturalistic looking tree.

Tuesday, 4 March 2014
Weekly Targets
- Continue working on assets for my Knight level
- Choose some of my best models to retopologise for my art gallery
- Update my online portfolio
Tuesday, 25 February 2014
Grounded: The Making of The Last of Us
Sony have just released a full length, behind the scenes documentary about the creation of Naughty Dogs' 2013 masterpiece, The Last of Us. It's really interesting to see the development process, and studio workflow behind such a big title. I've now heard, quite a few times, how big projects like this tend to come together right at the last second, John Lasseter said that all the Pixar movies were on the constant brink of failure, and last year at Gamehorizon David Polfeldt (Massive Entertainment) said that Far Cry 3 wasn't great until the last stages of development. So it's refreshing to hear Naughty Dog say the same about The Last of Us, it's similar to the way I feel on each module!
Monday, 17 February 2014
Creative CV: Art Gallery Portfolio
I've had to put my 'Illuminated Knight' project on hold, I've been asked to update my portfolio as people at college are interested in seeing what I can do. Morrisons have contacted 'the powers that be' at college enquiring about the possibility of making a 3D walkthrough of one of their stores, with the work I've done so far in UDK my tutor has put my name forward. I wasn't happy with showing them a walkthrough of my level in its current state, so I thought I could kill two birds with one stone by creating a 3D art galley in UDK that could act as an interactive portfolio which I could send to prospective clients. I feel this would be a great way to showcase models, videos, and images that I've created rather than just a list of images on my blog.
After sketching out a quick design I began blocking out the gallery in UDK using simple BSP brushes. The viewer will start in a large atrium/gift shop that will have details about me, my interests, and skills that will serve as a more traditional CV. From the atrium they'll be free to explore the gallery as they see fit with rooms devoted to each project or a specific area of design. This will be an ongoing project as my portfolio develops, but I've left plenty of room for expansion, so I can add new rooms for each project I work on. Once I've created a few of my own game levels I want the viewer to be able to click on images of said levels and be transported to them (ala Mario 64). Eventually I want to add NPC that walk around and comment on the artwork within the gallery. Maybe I can voice a grumpy old man pointing out the flaws with my own designs?

I started to apply some simple textures, trying to create that modern gallery feel in a refurbished old building, as with real galleries the building should not over-shadow the artwork but enhance it.

This project was another learning curve, I was having issues with shading and found BSP brushes behave differently to static meshes in UDK. To get better shading on a static mesh you have to increase the resolution of the shadow map, but it's the opposite with BSP brushes...who knew? It was also an opportunity to experiment with materials and shaders, I'm quite pleased with the chrome material I've made for the metal posts.

Doing this gallery has taught me a lot and will not only inform projects in the future but should feedback into my 'Knight' level. One of the great things about college is the ability to make mistakes, and learn from them. Making mistakes at work is a huge no-no but at college I've had the opportunity to experiment. Unfortunately I didn't realise that when you preview your level in UDK your character is 120 units high, however in game it's only 96 units! This means that the scales in both my levels are wrong and would need some major reworking! It's a mistake I'll never make again.

I've still got a lot of work to do on this gallery, mainly descriptions and plaques that explain each project, but also sound effects, menus, overlays, and some interactivity for the viewer. As I said it's an ongoing project so I'll be returning to it over the next few weeks.
After sketching out a quick design I began blocking out the gallery in UDK using simple BSP brushes. The viewer will start in a large atrium/gift shop that will have details about me, my interests, and skills that will serve as a more traditional CV. From the atrium they'll be free to explore the gallery as they see fit with rooms devoted to each project or a specific area of design. This will be an ongoing project as my portfolio develops, but I've left plenty of room for expansion, so I can add new rooms for each project I work on. Once I've created a few of my own game levels I want the viewer to be able to click on images of said levels and be transported to them (ala Mario 64). Eventually I want to add NPC that walk around and comment on the artwork within the gallery. Maybe I can voice a grumpy old man pointing out the flaws with my own designs?
I started to apply some simple textures, trying to create that modern gallery feel in a refurbished old building, as with real galleries the building should not over-shadow the artwork but enhance it.
This project was another learning curve, I was having issues with shading and found BSP brushes behave differently to static meshes in UDK. To get better shading on a static mesh you have to increase the resolution of the shadow map, but it's the opposite with BSP brushes...who knew? It was also an opportunity to experiment with materials and shaders, I'm quite pleased with the chrome material I've made for the metal posts.
Doing this gallery has taught me a lot and will not only inform projects in the future but should feedback into my 'Knight' level. One of the great things about college is the ability to make mistakes, and learn from them. Making mistakes at work is a huge no-no but at college I've had the opportunity to experiment. Unfortunately I didn't realise that when you preview your level in UDK your character is 120 units high, however in game it's only 96 units! This means that the scales in both my levels are wrong and would need some major reworking! It's a mistake I'll never make again.
I've still got a lot of work to do on this gallery, mainly descriptions and plaques that explain each project, but also sound effects, menus, overlays, and some interactivity for the viewer. As I said it's an ongoing project so I'll be returning to it over the next few weeks.
Monday, 10 February 2014
Illuminated Knight Level: Work in Progress
Having made the building models and terrain, unwrapped them, and begun texturing, my level is starting to come together. There's still a huge amount of work to do and at the moment the stained glass effect isn't obvious, that should come when I enable the edge checks renderer, and add my own custom textures to the sky and ocean. However the tight Medieval feel of the streets and the large cathedral structure are beginning to look like my initial designs.

It's been a huge learning curve especially as I've mainly been left to my own devices with no tuition on the software or even basic level design. However with my own artistic ability, perseverance, research, and hard work I'm starting to piece together the work flow involved in making a game level. I realise working in a studio I'd specialise in a specific area but this project has given me a great overview of the process, and really makes me appreciate the Herculean effort that's involved in creating games today.

It's been a huge learning curve especially as I've mainly been left to my own devices with no tuition on the software or even basic level design. However with my own artistic ability, perseverance, research, and hard work I'm starting to piece together the work flow involved in making a game level. I realise working in a studio I'd specialise in a specific area but this project has given me a great overview of the process, and really makes me appreciate the Herculean effort that's involved in creating games today.
Saturday, 1 February 2014
Illuminated Knight Opening Cinematic
Once I'd rigged my character and created the cathedral interior it was time to bring it all together. Based on my storyboard I broke the scene down step by step to help make the animation more manageable.
The first time we see the knight is when he opens the cathedral door and a battle rages behind him. I'd already created vectors of knights fighting to animate in the background and wanted to blend them into a fiery background to emphasise the hellish world the knight was trying to escape.

Light is very important to me in this scene as it plays a big part in the overall theme of the game concept. As the knight walks down the aisle I wanted the light from the stained glass windows to ripple over him, almost as if it's defining his form. To achieve this I used volumetric lights with the stained glass textures as projection maps. It's the first time I've used volumetric lighting and I had to experiment with different settings to achieve something I was happy with. I animated the phase value in the volumetric fog settings to simulate small dust particles that move about within the light shafts, to suggest the building has been neglected for quite some time. However the more I added to the scene the more difficult it was to get feedback on how it was looking as preview renders were taking forever!

It's way too bright at the moment but there's still a lot of experimentation to do before it's finished, but as proof of concept it's starting to come together. I've set up the various camera positions, but still need to work on the animations of the knight before I can move forward.
If I'm honest it's been a bit of a struggle, I came to college with some knowledge of 3D modelling and hoped my tutors would be there to help when I needed answers to specific problems with rendering, animation, and lighting. As self motivated as I am and the countless hours I spend searching the net for answers when I get stuck, the college has not been able to help with any of my issues. At the moment I'm struggling with render times, it's going to take days to render this animation as is and I just don't have the time to take my computer out of action for that long. If college set up Backburner on the networked PC's they have 3DS Max on (something that would take minutes) I'd be able to use a render farm and get it done in a night, but throughout my time I've encountered heavy resistance to any kind of change. For now I'm going to have to leave this animation and come back to it during the summer when I can render it in my own time.

The first time we see the knight is when he opens the cathedral door and a battle rages behind him. I'd already created vectors of knights fighting to animate in the background and wanted to blend them into a fiery background to emphasise the hellish world the knight was trying to escape.
Light is very important to me in this scene as it plays a big part in the overall theme of the game concept. As the knight walks down the aisle I wanted the light from the stained glass windows to ripple over him, almost as if it's defining his form. To achieve this I used volumetric lights with the stained glass textures as projection maps. It's the first time I've used volumetric lighting and I had to experiment with different settings to achieve something I was happy with. I animated the phase value in the volumetric fog settings to simulate small dust particles that move about within the light shafts, to suggest the building has been neglected for quite some time. However the more I added to the scene the more difficult it was to get feedback on how it was looking as preview renders were taking forever!
It's way too bright at the moment but there's still a lot of experimentation to do before it's finished, but as proof of concept it's starting to come together. I've set up the various camera positions, but still need to work on the animations of the knight before I can move forward.
If I'm honest it's been a bit of a struggle, I came to college with some knowledge of 3D modelling and hoped my tutors would be there to help when I needed answers to specific problems with rendering, animation, and lighting. As self motivated as I am and the countless hours I spend searching the net for answers when I get stuck, the college has not been able to help with any of my issues. At the moment I'm struggling with render times, it's going to take days to render this animation as is and I just don't have the time to take my computer out of action for that long. If college set up Backburner on the networked PC's they have 3DS Max on (something that would take minutes) I'd be able to use a render farm and get it done in a night, but throughout my time I've encountered heavy resistance to any kind of change. For now I'm going to have to leave this animation and come back to it during the summer when I can render it in my own time.
Subscribe to:
Posts (Atom)